This summer, my family and I took a trip to Yellowstone National Park. We were there for several days and did lots of hiking and sight-seeing.
I almost always shoot with my camera on “Manual Mode”—the mode where you choose all the settings yourself. BUT, on this trip, I found that I slipped the camera into aperture priority—one of the semi-automatic modes on my DSLR camera.
“What is aperture priority?” you ask!
Today I thought I would explain WHAT some of these semi-automatic modes are and WHEN you might want to use them.
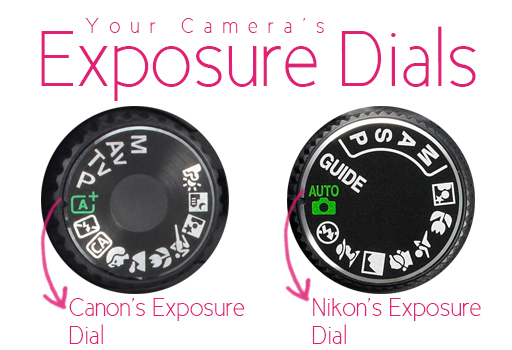
All of your camera’s exposure modes are found on the dial on top of your camera. It looks like this:

Does this look familiar? I am sure that it does.
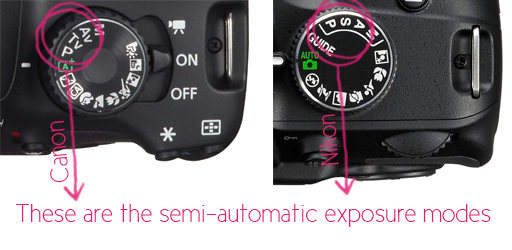
When I talk about the “semi-automatic” modes, I am talking only about 3 of the settings you’ll find up there. These three to be exact.

P stands for programmed auto.
This means that the camera automatically adjusts the shutter and aperture. It is almost the same as auto, but you have control of all the other settings (ISO, flash, etc.). I don’t use this setting much because it isn’t much different from auto. This would be great for snapshots.
A or Av stands for Aperture Priority.
This means that you set the aperture using your command dial and the camera adjusts the shutter setting. I use this mode the most of the three. It works nice for anytime you might want to control the aperture. For example, when taking a landscape shot you’d want to choose a high number aperture to get lots of depth of field. Or, when you’d like to choose a low number aperture to blur the background of a portrait. The camera will choose the other settings for me.
S or Tv stands for Shutter Priority.
This means that you set the shutter speed using the same command dial and your camera adjusts the aperture. This mode is great when you want to freeze motion or show motion—both are times when you will need to control your shutter. If I want to capture kids running, then I’ll likely want a fast shutter speed like 1/500 or 1/1000. If I want to create a little blur to show that something is moving, I’ll choose a slow shutter like 1/60 or 1/100. The camera will choose the other settings for me.
When to Use These Modes
I use these modes when I am in a hurry or whenever I don’t want to think about setting all the settings myself. I find myself on these settings when I am on vacation or in a hurry. These settings seem to work good in most lighting situations except for back light—when the sun is behind your subject. When I have this type of lighting, I will switch back to manual mode because this type of lighting trick the camera’s light meter!
*Hot Tip*
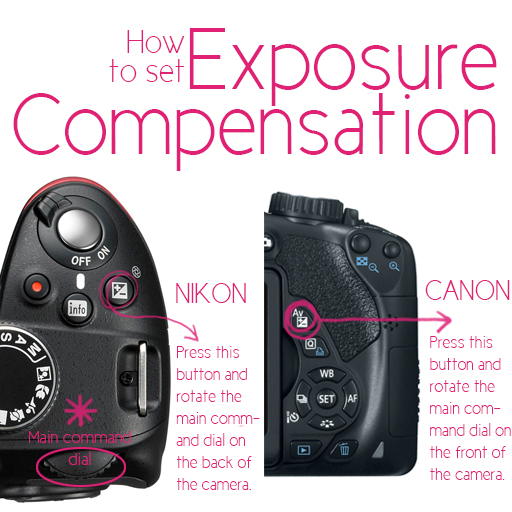
If you want to use an automatic mode but get results similar to that of using manual mode, try this shortcut. Set your camera to one of the above modes and take a shot. If you find that the result is to dark or too light, use your exposure compensation button to adjust it. Roll the exposure compensation to the “+” to make your shot brighter or to the “-” to make your shot darker.


Thanks for the tips! Great for an amateur mom & camera like me!
You are welcome!!
Found this very informative.
Thank you, thank you. I recieved a DSLR camera for my birthday last week. After years of point and shoot’s, it’s bunches of fun. But I am really having to learn.
You are welcome! There is lots to learn and so much fun. Enjoy! ♥
Thank you so much! I’ve wondered so many time when I should use these modes or what they actually meant. I’ve read so many posts on websites that make camera settings sound so complicated that I can’t figure out what they are saying and I get frustrated. You explain it so nicely and I love that I can understand. Again, THANK YOU!! 😀
Thanks for your nice compliment, Vannessa! ♥
Aww your photos make me want so bad a newer model Canon body. Can you do a post on the “Pre-Program” custom settings – some tips and tricks for that?
Are you referring to all the other shooting modes on the camera’s exposure dial? If so, that post is on my list.
Awesome post! I love playing with the aperture, it can change your photos so much.
Thanks, I get overwhelmed looking at manuals, this makes it easier. I have enjoyed your whole series and I think I have printed everyone of them out. For the odd man out who has a Sony, I assume the A, S, and P are what works for mine? We just bought a new Sony, and my husband is the only one that has had time to play around with it, I still need a lesson. 🙂
Yes. Sony is similar to the Nikon dial above. Have fun experimenting.
I shoot AV 99% of the time and like it a lot. What are the advantages to shooting manual instead of AV? You mentioned backlit situations, but what else? I’ve never really understood the appeal of shooting manual but I know that lots of people love it. With AV, I typically select the aperture I want, make sure the shutterspeed is fast enough, and then adjust the ISO to make it fast enough, or if the ISO is getting too high, adjust the aperture. How is shooting in manual better than that? Thanks!
Any time you have harsh lighting—meaning there are harsh highlights and shadows in your scene, your in-camera light meter will have trouble figuring which one to expose for. Generally it will just expose for the average and the average is usually an underexposed photo. Harsh light and back light are the two biggest reasons that I use manual. If I couldn’t use manual, then I would use aperture priority/shutter priority and override my settings using exposure compensation, like I talked about above.
I love your Nikon vs Canon diagrams to make it easier to understand and also to share this article to both types of users. I also shoot in Aperture b/c the lighting can change as my son moves between sunlight and shade, and just letting the camera figure it out has been a time-saver.
That is a great reason to use aperture priority! I use it when I need to move/think fast, too!
Thank you so much for taking the time to explain these settings! Totally excited to give them a try!
Great post. I like these bite sized post which are easy to process for a photography novice like me. I’ll try the Av mode today and see if I can put what I just learned here into practice.